Leap Year Calculator in C#
Introduction
Table of Contents
Welcome to today’s lesson on creating a Leap Year Calculator in C# console! In this tutorial, we will guide you step by step through the process of building a program that can determine whether a given year is a leap year or not.
Now, before we dive into the technical details, let’s quickly understand what a leap year is. A leap year is a year that contains an additional day, February 29th, making it 366 days instead of the usual 365. This adjustment is necessary to keep our calendar in sync with the Earth’s revolutions around the sun.
Creating a leap year calculator may sound like a daunting task, but fear not! By the end of this lesson, you will have a solid understanding of how to write efficient and accurate code to determine leap years.
Throughout this tutorial, we will be using C# console, which is a versatile and beginner-friendly programming language. Don’t worry if you’re new to C# or programming in general – we will explain everything in a clear and concise manner.
Objectives
In this lesson on creating a Leap Year Calculator in C# console, we have four main objectives: Understand, Learn, Practice, and Apply. Each objective is designed to ensure that you not only gain a comprehensive understanding of leap years and how to determine them but also get hands-on experience in coding and applying the concepts you learn.
- Understand: Our first objective is to help you understand the concept of leap years and why they are necessary. We will explain the rules and criteria that determine whether a year is a leap year or not. By the end of this lesson, you will have a clear understanding of the logic behind leap year calculations.
- Learn: Our second objective is to equip you with the knowledge and skills required to write efficient code in C# that can accurately determine leap years. We will cover the necessary syntax, data types, and logical operations involved in creating a leap year calculator. Through detailed explanations and code examples, you will learn the fundamentals of programming leap year calculations.
- Practice: To solidify your understanding and enhance your coding skills, our third objective is to provide you with ample opportunities to practice what you have learned. We will present you with coding exercises and challenges that involve leap year calculations. By actively engaging in practice exercises, you will gain confidence in your coding abilities and reinforce the concepts covered in this lesson.
- Apply: Our final objective is to encourage you to apply the knowledge and skills you have acquired to real-world scenarios. We will guide you through the process of building a Leap Year Calculator in C# console. By implementing the concepts you have learned, you will be able to create a functional program that can determine leap years accurately. This practical application will further enhance your understanding and showcase your ability to apply coding concepts effectively.
By focusing on these four objectives – understand, learn, practice, and apply – we aim to provide a well-rounded learning experience that caters to learners of all levels. Whether you are a beginner or an experienced programmer, this lesson will offer valuable insights and opportunities for growth.
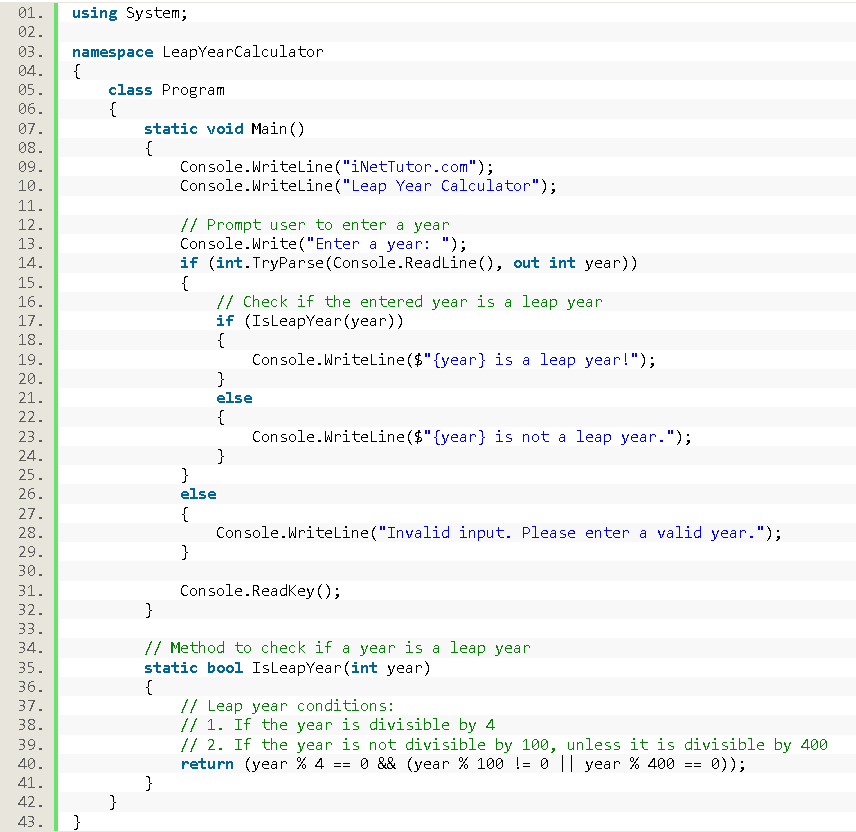
Source code example
using System;
namespace LeapYearCalculator
{
class Program
{
static void Main()
{
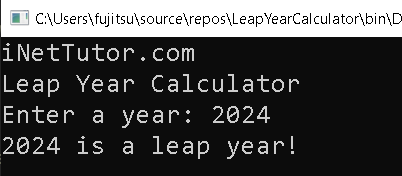
Console.WriteLine("iNetTutor.com");
Console.WriteLine("Leap Year Calculator");
// Prompt user to enter a year
Console.Write("Enter a year: ");
if (int.TryParse(Console.ReadLine(), out int year))
{
// Check if the entered year is a leap year
if (IsLeapYear(year))
{
Console.WriteLine($"{year} is a leap year!");
}
else
{
Console.WriteLine($"{year} is not a leap year.");
}
}
else
{
Console.WriteLine("Invalid input. Please enter a valid year.");
}
Console.ReadKey();
}
// Method to check if a year is a leap year
static bool IsLeapYear(int year)
{
// Leap year conditions:
// 1. If the year is divisible by 4
// 2. If the year is not divisible by 100, unless it is divisible by 400
return (year % 4 == 0 && (year % 100 != 0 || year % 400 == 0));
}
}
}
Explanation
Let’s go through the provided source code step by step:
- The code begins by importing the System namespace, which provides access to various types and functionalities in C#.
- The code then defines a namespace called LeapYearCalculator and a class called Program.
- Inside the Main method, the program displays the introductory messages “iNetTutor.com” and “Leap Year Calculator” using Console.WriteLine().
- The program prompts the user to enter a year using Console.Write() and reads the input using Console.ReadLine().
- The entered year is then parsed into an integer using int.TryParse().
- If the parsing is successful, the program calls the IsLeapYear() method to check if the entered year is a leap year.
- Depending on the result, the program displays the appropriate message using Console.WriteLine().
- If the parsing fails, indicating an invalid input, an error message is displayed.
- The code defines a method called IsLeapYear() that takes an integer parameter year and returns a boolean value.
- Inside the method, the leap year conditions are checked using logical operations.
- If the year is divisible by 4 and not divisible by 100 (unless it is divisible by 400), the method returns true, indicating a leap year. Otherwise, it returns false.
This source code allows the user to input a year and determines whether it is a leap year or not based on the defined conditions. It demonstrates the use of methods, conditional statements, and console input/output in C#.
Output
Summary
In this lesson, we covered the process of creating a Leap Year Calculator in C# console. Our objectives were to help you understand the concept of leap years, learn the necessary programming skills, practice applying those skills, and ultimately create a functional Leap Year Calculator.
We began by explaining the significance of leap years and the rules that determine whether a year is a leap year or not. We then delved into the fundamental concepts of C# programming, such as syntax, data types, and logical operations. By following the provided source code example, you learned how to prompt the user for input, validate and parse that input, and implement the leap year calculation logic.
Throughout the lesson, we emphasized the importance of practice. We encouraged you to actively engage with coding exercises and challenges to reinforce your understanding and enhance your skills. By practicing and experimenting with the concepts covered, you gained confidence in your ability to write efficient and accurate code.
Finally, we focused on the practical application of the knowledge gained. By implementing the leap year calculation logic in a functional C# console program, you were able to create your very own Leap Year Calculator. This practical exercise allowed you to apply your programming knowledge in a real-world scenario and solidify your understanding of leap year calculations.
Overall, this lesson provided a comprehensive overview of creating a Leap Year Calculator in C# console. It aimed to make the learning process accessible and user-friendly, ensuring that you could follow along and grasp the concepts without feeling overwhelmed. By achieving the objectives of understanding, learning, practicing, and applying, you gained valuable skills and knowledge that can be further expanded upon in your programming journey.
Exercises and Assessment
Here are some exercises to further enhance the Leap Year Calculator source code:
- User-Friendly Output:
- Modify the output messages to provide more user-friendly and informative responses.
- For example, specify whether a non-leap year is non-leap due to not being divisible by 4, being divisible by 100, or not being divisible by 400.
- Range of Years:
- Extend the program to handle a range of years. Allow users to input a starting and ending year, then determine and display which years within that range are leap years.
- Error Handling Improvement:
- Enhance the error-handling mechanism to handle a wider range of invalid inputs, providing more specific messages to guide users in entering valid years.
- Console Interface Enhancement:
- Improve the overall console interface, adding more prompts, clear instructions, and possibly a simple menu for users to choose different operations.
- Leap Year Count:
- Implement a feature to count and display the total number of leap years within a given range.
- Interactive Loop:
- Encapsulate the leap year checking logic in a loop, allowing users to continuously check years until they choose to exit.
These exercises aim to expand the functionality of the Leap Year Calculator, making it more versatile, user-friendly, and capable of handling different scenarios. As learners engage with these exercises, they will gain a deeper understanding of C# programming concepts and enhance their problem-solving skills.
Related Topics and Articles:
C# IF ELSE Statement Video Tutorial and Source code
Random Number Generator in CSharp
Methods in C# Video Tutorial and Source code
You may visit our Facebook page for more information, inquiries, and comments. Please subscribe also to our YouTube Channel to receive free capstone projects resources and computer programming tutorials.
Hire our team to do the project.