Number Pyramid in C#
Introduction
Table of Contents
In this lesson, we will explore the fascinating world of nested loops in C# and discover their powerful applications in creating captivating patterns. Nested loops are a fundamental programming concept that involves placing one loop within another loop. They allow us to repeat a series of actions multiple times, providing us with precise control over the flow of our code. Nested loops are particularly useful when it comes to generating intricate patterns, such as the number pyramid we will be focusing on in this lesson. By leveraging the capabilities of nested loops, we will learn how to construct a visually stunning number pyramid with a height of 5. So, get ready to unlock the potential of nested loops and embark on a journey of creativity and mastery as we delve into the realm of number pyramid patterns in C#.
Nested loops can significantly improve program efficiency in certain scenarios. By utilizing nested loops, we can efficiently process and manipulate data in a structured manner. Here are a few ways nested loops contribute to program efficiency:
- Reduced memory access: Nested loops take advantage of spatial locality, which means that data accessed in close proximity is more likely to be stored in the CPU cache. This reduces the number of times the CPU needs to access main memory, resulting in faster execution times.
- Optimized algorithmic complexity: Nested loops allow us to iterate over multi-dimensional data structures, such as matrices or arrays. This enables us to perform operations on each element efficiently, resulting in improved time complexity. However, it’s important to note that the time complexity can still depend on the specific problem and the number of nested loops 1.
- Structured data processing: Nested loops provide a structured approach to process data. By breaking down complex tasks into smaller iterations, we can focus on specific subsets of data at each level. This improves code readability and maintainability, making it easier to understand and debug the program.
- Flexibility in problem-solving: Nested loops offer flexibility in solving problems that require nested iterations. They allow us to handle complex patterns, relationships, or dependencies between data elements. This flexibility enables us to tackle a wide range of problems efficiently and effectively.
While nested loops can improve program efficiency, it’s important to note that excessive nesting or inefficient loop logic can have a negative impact on performance. It’s crucial to carefully design and optimize nested loops based on the specific problem at hand. By understanding the principles and best practices of nested loops, we can harness their power to enhance program efficiency and achieve optimal results.
Objectives
The objectives of this lesson are designed to provide you with a comprehensive understanding of nested loops and their applications in C# programming. Nested loops are a powerful tool that allow us to repeat actions in a structured and controlled manner, enabling efficient data processing and pattern generation. Throughout this lesson, we will explore the concept of nested loops, learn the syntax and usage in C#, practice implementing nested loops to create complex patterns, and finally, apply our knowledge to construct captivating number pyramid patterns. By the end of this lesson, you will have gained a solid foundation in nested loops and be able to leverage their potential to enhance your programming skills.
Specific objectives:
- Understand: Grasp the concept of nested loops and their role in constructing intricate numerical patterns.
- Learn: Acquire the skills to implement nested loop structures to build a number pyramid in C#.
- Practice: Engage in hands-on exercises to reinforce your understanding and strengthen coding proficiency.
- Apply: Demonstrate your newfound skills by creating a mesmerizing number pyramid, showcasing your ability to translate conceptual knowledge into practical code.
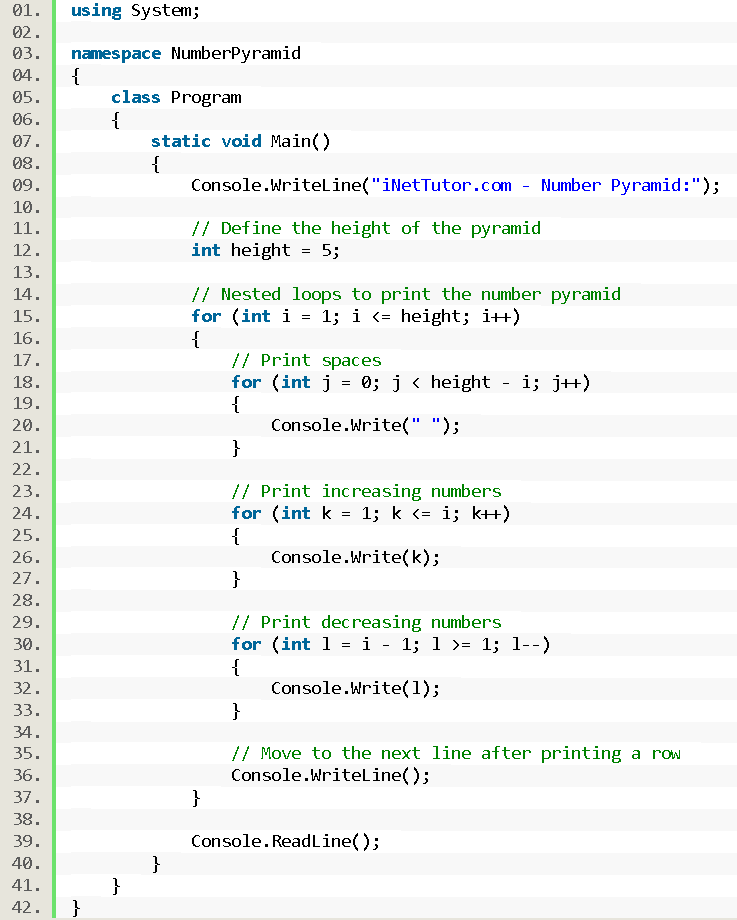
Source code example
using System;

namespace NumberPyramid
{
class Program
{
static void Main()
{
Console.WriteLine("iNetTutor.com - Number Pyramid:");

// Define the height of the pyramid
int height = 5;

// Nested loops to print the number pyramid
for (int i = 1; i <= height; i++)
{
// Print spaces
for (int j = 0; j < height - i; j++)
{
Console.Write(" ");
}

// Print increasing numbers
for (int k = 1; k <= i; k++)
{
Console.Write(k);
}

// Print decreasing numbers
for (int l = i - 1; l >= 1; l--)
{
Console.Write(l);
}

// Move to the next line after printing a row
Console.WriteLine();
}

Console.ReadLine();
}
}
}
Explanation
This code generates a number pyramid pattern using nested loops in C#. Here’s a breakdown of how the code works:
- The using System; statement is used to include the System namespace, which provides access to the Console class for input and output operations.
- The code is organized within the NumberPyramid namespace.
- The Program class is defined within the NumberPyramid namespace.
- The Main method is the entry point of the program and is where the execution begins. It is declared as static void Main().
- The Console.WriteLine(“iNetTutor.com – Number Pyramid:”); statement is used to display a message indicating the purpose of the program.
- The height variable is defined to store the desired number of rows in the number pyramid. In this case, it is set to 5.
- The outer for loop iterates through each row of the pyramid, starting from 1 and continuing until it reaches the value of height.
- Inside the outer loop, there are three nested loops:
- The first inner for loop is responsible for printing the spaces before the numbers. It iterates from 0 to height – i, where height – i determines the number of spaces needed before the numbers in each row.
- The second inner for loop prints the increasing sequence of numbers in each row. It starts from 1 and continues until it reaches the value of i.
- The third inner for loop prints the decreasing sequence of numbers in each row. It starts from i – 1 and continues until it reaches 1.
- After printing each row, the Console.WriteLine(); statement is used to move to the next line.
- Finally, the Console.ReadLine(); statement is used to keep the console window open until the user presses Enter, allowing them to view the result.
By running this code, you will see the number pyramid pattern displayed in the console output.
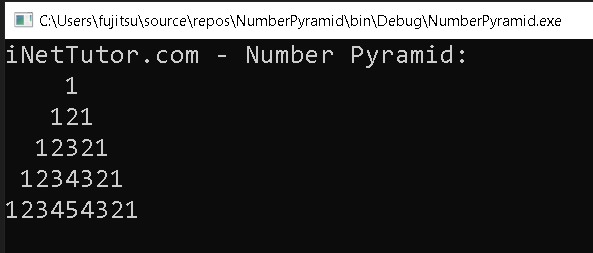
Output
Summary
This lesson delved into the exciting realm of nested loops in C#, guiding you through the construction of a majestic number pyramid with a height of 5. You explored:
- The power of nested loops: You learned how loops within loops can build intricate patterns like the number pyramid, one level at a time.
- Crafting the pyramid step-by-step: By deciphering the code line by line, you witnessed the logic behind printing spaces, ascending numbers, and descending numbers to create the desired shape.
- Understanding beyond execution: Moving beyond simply following the code, you gained a deeper understanding of its inner workings, empowering you to modify and create your own number pyramids in the future.
This lesson wasn’t just about building a pyramid; it was about unlocking the creative potential of C# and your coding skills. By mastering nested loops, you’ve laid the foundation for tackling more complex coding challenges and artistic endeavors. Remember, coding is a continuous journey of discovery. Keep practicing, experimenting, and applying your newfound skills to build even more impressive structures and patterns with code!
Exercises and Assessment
Exercises:
- Variable Height Pyramid: Modify the program to accept a user-defined height for the pyramid, allowing for dynamic and customizable patterns.
- Character Pyramid: Enhance the program to print a pyramid using characters or symbols instead of numbers, offering a versatile challenge in pattern manipulation.
- Interactive Pyramid: Develop a version where the user can choose the type of pyramid (numbers, characters, or symbols) and input the height dynamically.
Assessment: Design an assessment that evaluates the following:
- Logic and Pattern Formation: Assess the clarity of the pyramid pattern, ensuring it adheres to the specified requirements.
- Code Readability: Evaluate the readability of the code, emphasizing the use of meaningful variable names and proper indentation.
- User Interaction: If applicable, assess how well the program engages users, especially in scenarios where they can input parameters.
Lab Exam: During a lab exam, students can be tasked with:
- Enhancement Challenge: Given a basic pyramid program, instruct students to enhance it by incorporating additional features such as color, animation, or a user-friendly interface.
- Debugging Exercise: Present students with a partially erroneous pyramid program and assess their debugging skills in identifying and rectifying the issues.
- Pattern Customization: Task students with creating a program that allows users to customize the pyramid’s pattern, providing a comprehensive assessment of their understanding of loop structures and user interaction.
These exercises, assessments, and lab exam suggestions aim to offer a well-rounded evaluation of students’ comprehension and proficiency in creating diverse and advanced pyramid patterns using C# loops.
Related Topics and Articles:
Password Validation with Retry Limit in C#
Encrypt and Decrypt Password Using C#
You may visit our Facebook page for more information, inquiries, and comments. Please subscribe also to our YouTube Channel to receive free capstone projects resources and computer programming tutorials.
Hire our team to do the project.