Area of Rectangle Solver in CSharp
Introduction
In C#/.NET, calculating the area and perimeter of a rectangle involves applying basic mathematical formulas. The area of a rectangle is determined by multiplying its length and width, while the perimeter is found by adding the lengths of all four sides.
To calculate the area of a rectangle, we multiply the length (L) by the width (W). The formula is:
Area = Length * Width
To calculate the perimeter of a rectangle, we add all four sides together. Since opposite sides of a rectangle are equal in length, we can simplify the formula:
Perimeter = 2 * (Length + Width)
By utilizing these formulas, we can develop programs that prompt the user to input the dimensions of a rectangle, perform the necessary calculations, and display the area and perimeter results.
These calculations are fundamental in various fields, including mathematics, engineering, computer graphics, and data analysis. They provide valuable insights into the geometric properties of rectangles and help in solving real-world problems related to area, space allocation, and shape comparisons.
In C#/.NET, implementing the calculations for the area and perimeter of a rectangle is straightforward, and understanding these concepts allows developers to build applications that involve geometric calculations, data visualization, and spatial analysis.
Objectives
Here are some outcome-based objectives for studying the topic of area and perimeter of a rectangle in C#/.NET:
- Objective: Understanding the Concept
- Outcome: Gain a clear understanding of the concept of area and perimeter in relation to a rectangle.
- Indicator: Explain the formulas used to calculate the area and perimeter of a rectangle.
- Objective: Implementing Calculations
- Outcome: Acquire the ability to write C# code to calculate the area and perimeter of a rectangle.
- Indicator: Develop a program that prompts the user for length and width inputs, performs the calculations, and displays the results accurately.
- Objective: Error Handling
- Outcome: Learn to handle and validate user input to ensure accurate calculations.
- Indicator: Implement error trapping techniques to handle invalid inputs for length and width, and provide appropriate error messages to the user.
- Objective: Problem Solving
- Outcome: Develop problem-solving skills by applying the area and perimeter calculations to practical scenarios.
- Indicator: Solve real-world problems involving rectangles, such as calculating the material needed for a rectangular room or determining the fencing required for a rectangular garden.
Source code Example
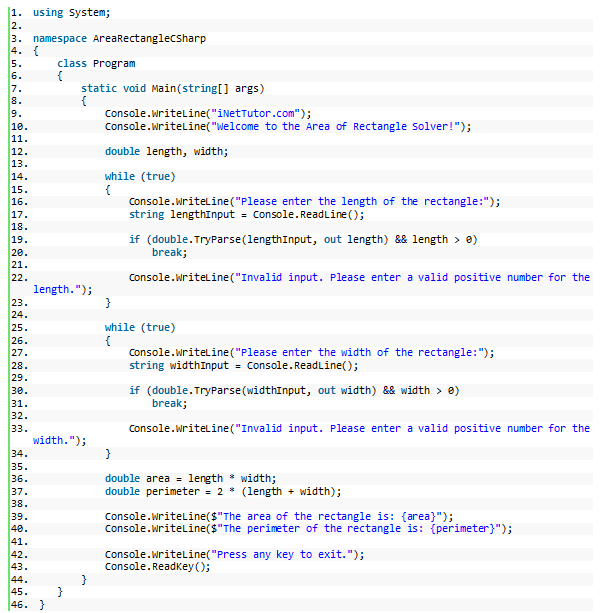
using System;

namespace AreaRectangleCSharp
{
class Program
{
static void Main(string[] args)
{
Console.WriteLine("iNetTutor.com");
Console.WriteLine("Welcome to the Area of Rectangle Solver!");

double length, width;

while (true)
{
Console.WriteLine("Please enter the length of the rectangle:");
string lengthInput = Console.ReadLine();

if (double.TryParse(lengthInput, out length) && length > 0)
break;

Console.WriteLine("Invalid input. Please enter a valid positive number for the length.");
}

while (true)
{
Console.WriteLine("Please enter the width of the rectangle:");
string widthInput = Console.ReadLine();

if (double.TryParse(widthInput, out width) && width > 0)
break;

Console.WriteLine("Invalid input. Please enter a valid positive number for the width.");
}

double area = length * width;
double perimeter = 2 * (length + width);

Console.WriteLine($"The area of the rectangle is: {area}");
Console.WriteLine($"The perimeter of the rectangle is: {perimeter}");

Console.WriteLine("Press any key to exit.");
Console.ReadKey();
}
}
}
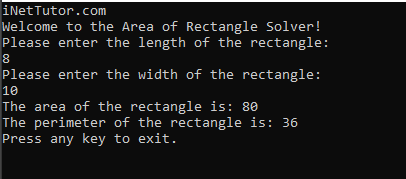
Output
Code Explanation
Line 9-10
The code Console.WriteLine(“iNetTutor.com”); is used to display the text “iNetTutor.com” on the console. This line serves as a branding or identification message to indicate the source or organization behind the program.
The code Console.WriteLine(“Welcome to the Area of Rectangle Solver!”); is used to display the text “Welcome to the Area of Rectangle Solver!” on the console. This line serves as a friendly greeting message to welcome the user to the program.
Both Console.WriteLine statements are responsible for printing text messages on the console, providing information and instructions to the user. In this case, they set the initial context and introduce the purpose of the program, which is to solve the area of a rectangle.
Line 12
The code double length, width; declares two variables of type double named length and width. These variables are used to store the dimensions of a rectangle.
By declaring these variables, we allocate memory to hold decimal numbers (floating-point values) that represent the length and width of the rectangle. The double data type in C# is capable of storing numbers with decimal places, allowing for more precise calculations.
Once these variables are declared, they can be assigned values obtained from user input or calculated values during the program execution. The length variable will hold the length of the rectangle, while the width variable will hold the width. These values are essential for calculating the area and perimeter of the rectangle.
Line 14-23
Here’s a breakdown of the code:
- while (true) – This sets up an infinite loop. The loop will continue until a break statement is encountered.
- WriteLine(“Please enter the length of the rectangle:”); – This displays a message asking the user to enter the length of the rectangle.
- string lengthInput = Console.ReadLine(); – This reads the user’s input from the console and stores it as a string in the variable lengthInput.
- if (double.TryParse(lengthInput, out length) && length > 0) – This condition checks if the user’s input can be successfully converted to a double value using the double.TryParse() method. If the conversion is successful (TryParse returns true) and the length is greater than 0, the condition evaluates to true.
- break; – If the user enters a valid length (a positive number), the break statement is executed, which exits the loop and continues with the rest of the program.
- WriteLine(“Invalid input. Please enter a valid positive number for the length.”); – If the user’s input cannot be parsed to a valid double or the length is not a positive number, this message is displayed to indicate that the input was invalid. The loop continues, prompting the user to enter a valid length again.
By using this loop with input validation, the program ensures that the user enters a valid and positive length for the rectangle, preventing unexpected errors and calculations based on incorrect data.
Line 25-34
Similar to the previous code, this loop with input validation ensures that the user enters a valid and positive width for the rectangle. It helps maintain data integrity and ensures accurate calculations based on the user’s input.
Line 36-37
The source code line 36-37 calculates the area and perimeter of a rectangle using the given length and width values.
Here’s a breakdown of the code:
double area = length * width; – This line calculates the area of the rectangle by multiplying the length and width values together. The result is assigned to the variable area.
double perimeter = 2 * (length + width); – This line calculates the perimeter of the rectangle by adding the length and width together, then multiplying the sum by 2. The result is assigned to the variable perimeter.
By performing these calculations, the program determines the area and perimeter of the rectangle based on the user-provided length and width values. These calculations are based on the formulas for area (length * width) and perimeter (2 * (length + width)) of a rectangle.
Line 39-40
The line 39-40 is responsible for displaying the calculated area and perimeter of the rectangle on the console.
Console.WriteLine($”The area of the rectangle is: {area}”); – This line uses string interpolation to display the calculated area of the rectangle. The value of the area variable is inserted within the curly braces {} to dynamically include it in the output message. The message “The area of the rectangle is: ” is displayed followed by the calculated area value.
Console.WriteLine($”The perimeter of the rectangle is: {perimeter}”); – This line also uses string interpolation to display the calculated perimeter of the rectangle. The value of the perimeter variable is inserted within the curly braces {} to dynamically include it in the output message. The message “The perimeter of the rectangle is: ” is displayed followed by the calculated perimeter value.
Line 42-43
The purpose of this code is to provide a way for the user to control the termination of the program. After displaying the calculated area and perimeter of the rectangle, the program pauses execution and waits for the user to acknowledge the results by pressing any key. This gives the user an opportunity to view the output before the program terminates.
Summary
In this blog post, we explored the concept of creating a High-Low Number Checker program in C#. We discussed the importance of finding the highest and lowest numbers among a set of user inputs. The tutorial provided step-by-step instructions on building the program, including error trapping for user input. By following the tutorial, readers learned how to prompt the user for multiple numbers, validate the input, and determine the highest and lowest values using conditional statements and built-in C# functions. The blog post encouraged readers to practice and experiment with the code on their own, promoting a deeper understanding of the topic. Overall, the tutorial equipped readers with the knowledge and skills to create a High-Low Number Checker program in C#, empowering them to handle similar tasks in their own projects.
Related Topics and Articles:
POS System Using C#.Net Winforms and MS Access Free Source code
Array in C# Video Tutorial and Source code
You may visit our Facebook page for more information, inquiries, and comments. Please subscribe also to our YouTube Channel to receive free capstone projects resources and computer programming tutorials.
Hire our team to do the project.