Tutorial Description:
This step by step tutorial in visual basic will teach us on how to print pictures in data report. The project has a MS Access database that holds the record of uploaded images.
What we need?
Of course, we need a visual basic 6 or the classic version of visual studio. Visual Basic 6 still runs on windows 7 and 8 operating system.
Let’s begin the tutorial
We design first the database
- Create a ms access database and save it as Data.mdb
- Create a table and save it as tblPicture.
- The table will contain:
ID – Autonumber (primary key)
picsname – Text
picsPath – Text
Visual Basic Project
1. Open your visual basic 6 and select Standard EXE.
2. Add a form. To add a form just click Project in the menu bar and select Add Form.
3. We will add the following control to our Form:
1 Image control
2 labels
2 textboxes
2 command buttons
1 common dialog control
4. In the menu bar click Project > Components > look and check for the Microsoft Common Dialog Control 6.0 (SP6). Click OK.
5. The form will look like the image below.
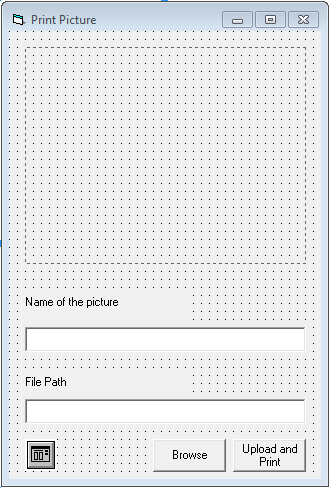
Change the name of the first textbox into txtpicsname, the second textbox into txtpicspath.
The browse button must have a name of cmdBrowse, the upload button into cmdUpload.
6. We need to connect our vb program to ms access.
7. We will add a module. Project in the menu bar and select Add Module, save it as DBConnect
8. Add the ADO in our project reference. Go to Project > References > look and check for Microsoft ActiveX Data Objects 6.0 Library or 2.5 – 2.8. Click OK.
9. Open and add the following code in the module
Public rs As New ADODB.Recordset
Public conn As New ADODB.Connection
Public sql As String
Public ConString As String
Sub Main()
On Error GoTo errHandler
ConString = "Provider=Microsoft.Jet.OLEDB.4.0;User ID=admin;Data Source=" & App.Path & "\Data.mdb;Jet OLEDB:Database Password="
conn.Open ConString
With rs
.CursorLocation = adUseClient
.CursorType = adOpenDynamic
.LockType = adLockOptimistic
End With
SplashFrm.Show
Exit Sub

errHandler:

MsgBox "Error Opening " & MSDatabase & vbNewLine & Err.Description, vbCritical, "Can't establish a connection"
End Sub
Code Explanation:
the code above will connect our vb6 project to our ms access database.
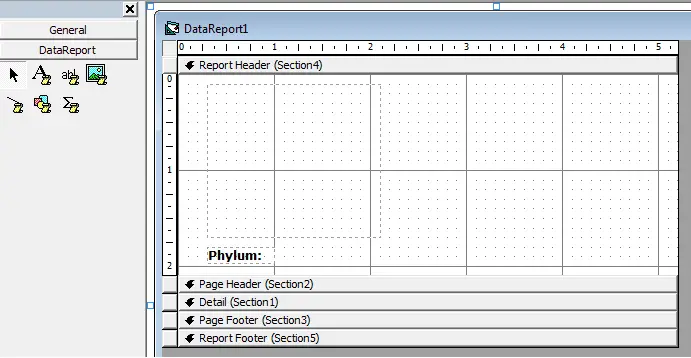
10. Next is to add a Data Report. Project > Add Data Report.
11. Open the the Report Header (Section4) of the Report.
12. Add a RptImage Control and RptLabel Control
13. Now back to our form. We will create a sub procedure to save the details of the image into the database.
Public Sub UploadImage()
If rs.State = adStateOpen Then rs.Close
msql = "Select * from tblPicture"
rs.Open msql, conn
With rs
.AddNew
!picsname = txtpicsname.Text
!picsPath = txtpicspath.Text
.Update
End With
End Sub
Code Explanation:
The code above will save the name of the picture and the path or the directory where the picture resides into the database.
14. Double click the browse button and paste the code below.
Dim extractedpath, thepic As String
Dim lentxt As Integer
Dim imge(1) As IPictureDisp
With CommonDialog1
.DialogTitle = "Browse Pictures"
.Filter = "JPEG Files(*.jpg)|*.jpg|BMP Files(*.bmp)|*.bmp"
.ShowOpen
Set imge(1) = LoadPicture(CommonDialog1.FileName)
Image1.Picture = imge(1)
txtpicspath.Text = (CommonDialog1.FileName)
thepic = (CommonDialog1.FileName)
Image1.Picture = LoadPicture(thepic)
End With
Code Explanation:
This code will allow you to browse for the image files on your computer,retrieve the path and preview or display the picture in the form.
15. Double click the upload and print button and paste the code
UploadImage
If rs.State = adStateOpen Then rs.Close
msql = "Select * from tblPicture where picsname='" & txtpicsname.Text & "' "
rs.Open msql, conn
Set DataReport1.DataSource = rs
Set DataReport1.Sections("Section4").Controls.Item("Image1").Picture = LoadPicture(txtpicspath.Text)
DataReport1.Sections("Section4").Controls.Item("Label5").Caption = txtpicsname.Text
DataReport1.Show 1
Code Explanation:
The code will call the function UploadImage which is responsible for saving the details of the image (name and path), it will then retrieve details of the image from the database and passed the value to the controls of the report.
16. Run the program. Press F5.