C# SWITCH Statement Video Tutorial and Source code
Table of Contents
This lesson is all about the decision control structures in C#, specifically the SWITCH statement. The lesson includes sample programs to better understand how switch statement works in C#.
In computer programming, a switch statement is a type of selection control statement that allows a program to choose from a number of possible courses of action, depending on the value of an expression. The switch statement consists of a block of code containing a number of case labels, followed by a default label. The expression is evaluated and the case label that is true is executed. If there are no case labels, the default label is executed.
Objectives
By the end of this lesson, students should be able to:
- demonstrate essential understanding on the switch statement
- create a program that implements the concept of switch statement
- solve problems using the concept of switch statement in C#.

Requirements
- Visual Studio IDE
The Visual Studio IDE (Integrated Development Environment) is a software program that lets you make software, websites, and online apps. It includes a code editor, a debugger, a project system, and a number of tools to aid software development.
Introduction
When a switch statement encounters a case label that is false, the program branches to the next case label and continues executing from there. The program does not execute any code between the default and the next case labels. If there are no more case labels, the program jumps to the default label.
A switch statement can be used for two basic purposes: selecting a function to call or selecting a data item to examine. The following code example shows how a switch statement can be used to select a function to call.
How it works
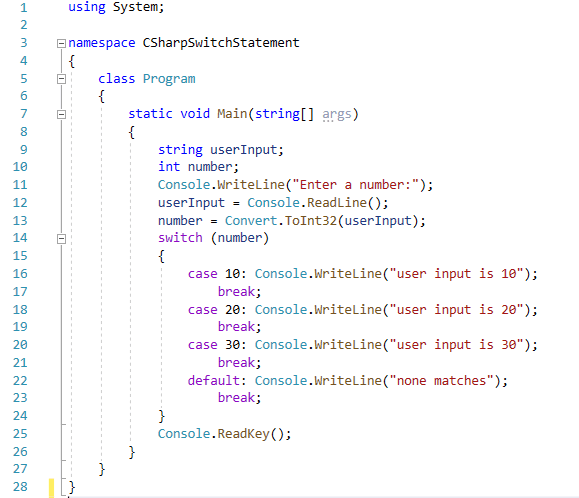
The example source code presented below is an example of switch statement in C#. In this C# .program, we have declared two variables; userInput of string type and number of integer type. The console program will ask the user to enter a number. That value will be stored into the userInput variable since ReadLine() method reads the line of characters from the standard input stream. The value is in a form of string and we will convert it into an integer type using the Convert.ToInt32. This is necessary since we will be comparing numbers in our switch statement. Next is the value of the expression is compared with the values of each case. If there is a match, the associated block of code is executed. The default keyword is optional and specifies some code to run if there is no case match.
Here is the example source code of switch statement in C#. We will explain source code line by line for you to better understand how if statement works and function.

Line 1 – We utilize the using keyword to add namespaces and class files. Class, interface, and abstract class information is displayed on the current page. Console is a System member function or method. The console function is required to display and read user input, hence it must be included first.
Line 3 – the name of the program is CSharpSwitchStatement.
Line 7 – main method is the entry point of all C# programs.
Line 9 – variable declaration, userInput is the variable name of string type. It simply means that the variable can accept alpha numeric values.
Line 10 – another variable has been declared, number is the variable name of integer type.
Line 11 – This line will display the text Enter a number: in the console.
Line 12 – Console.ReadLine takes the value entered and stores it in the userInput variable that we have declared in line 8.
Line 13 – The purpose of this line is to convert the userInput into an integer and store in in the number variable.
Line 14-24 – this is the scope of the switch statement. The statement will start at line 14 and ends at line 24.
Line 14 – this is the switch expression and this is only evaluated once.
Line 16 – this is the first case to be compared. If the value of the number is 10 then this case will be executed and the switch statement will end. user input is 10 will be displayed in the console
When C# reaches a break keyword, it breaks out of the switch block.
This will stop the execution of more code and case testing inside the block.
Line 18 – this is the second case to be compared. If the value of the number is 20 then this case will be executed and the switch statement will end. user input is 20 will be displayed in the console
Line 20 – this is the third case to be compared. If the value of the number is 30 then this case will be executed and the switch statement will end. user input is 30 will be displayed in the console
Line 22 – this is the default case and this is the block of code that will be executed if the value of our number variable has no match to any cases. none matches will be displayed in the console
Line 25 – the purpose of this line is to prevent the console from closing unless the user will press a key in the keyboard.
using System;

namespace CSharpSwitchStatement
{
class Program
{
static void Main(string[] args)
{
string userInput;
int number;
Console.WriteLine("Enter a number:");
userInput = Console.ReadLine();
number = Convert.ToInt32(userInput);
switch (number)
{
case 10: Console.WriteLine("user input is 10");
break;
case 20: Console.WriteLine("user input is 20");
break;
case 30: Console.WriteLine("user input is 30");
break;
default: Console.WriteLine("none matches");
break;
}
Console.ReadKey();
}
}
}
Video Tutorial
Summary
The main advantage of switch statements is that they allow you to execute a particular block of code based on a particular condition. This can be a more efficient way of executing code than using a series of if-else statements. Additionally, switch statements are often easier to read and understand than a series of if-else statements.
We hope you found this tutorial to be helpful! Wishing you the best of luck with your projects! Happy Coding!
For the step by step tutorial on how to create the if else if statement console application in C#, please watch the video uploaded on our YouTube Channel.
You may visit our Facebook page for more information, inquiries, and comments. Please subscribe also to our YouTube Channel to receive free capstone projects resources and computer programming tutorials.
Hire our team to do the project.
Related Topics and Articles:
C# NESTED IF Statement Video Tutorial and Source code
C# IF ELSE IF Statement Video Tutorial and Source code
C# IF ELSE Statement Video Tutorial and Source code


