File Upload in PHP and MySQL
Introduction
A great approach to share files with others is through the website’s file upload tool. Anyone with an internet connection can access it, and it is easy to use. You can share files that you upload from your computer to the internet with other users thanks to this feature. Additionally, you can control who is permitted to access and download the file. It is simple to use and a terrific way to exchange files with others.
This tutorial will teach you the basics of how to upload a file using the PHP programming language. You will learn how to select a file from your computer, how to upload the file using PHP, and how to save the uploaded file into the database.
Let’s get started with the development.
Objectives
By the end of this tutorial, you will be able to:
- Make a PHP script that links to a MySQL database so that user or site visitor can upload files from their computer and have them stored in the server’s folder and database
- Use move_uploaded_file() function to transfer files from local computer to the server’s upload directory.
- To integrate and apply the source code in your projects.
Source code explanation
You must have a fundamental understanding of both PHP and MySQL in order to develop a tutorial on how to upload files. You also need access to a server that can run MySQL and PHP. Once you have these things, you can create your tutorial by following the instructions below.
- XAMPP
- Text editor (VS Code, Sublime, Brackets), download and install a text editor of your choice
The image below displays the folder and file components of the project.
assets – this includes the bootstrap files such as bootstrap.css, js files and others.
uploadFile – this is the directory where the uploaded files will be stored.
file_upload.sql – this is the database of our project.
index.php – this is the file where the PHP scripts for this tutorial are written.
- We need first to create our database (file_upload). The statement below is the CREATE TABLE sql statement.
CREATE TABLE `file` (
`id` int(11) NOT NULL,
`filename` varchar(100) NOT NULL
) ENGINE=InnoDB DEFAULT CHARSET=utf8mb4;
Another method is to upload the file_upload.sql into your PHPMyAdmin. The name of the database would be file_upload and it has one table (file).
- The next thing is to create a form in that will allow the user to select a file from their computer and submit it or upload it on the server.
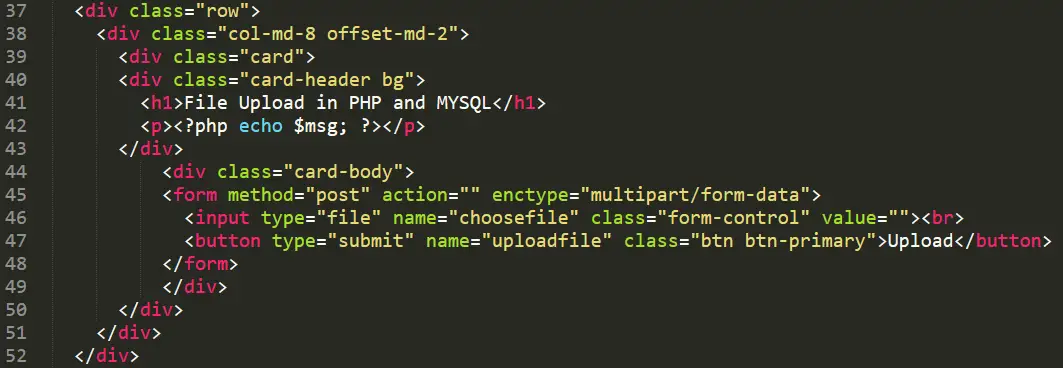
<div class="row">
<div class="col-md-8 offset-md-2">
<div class="card">
<div class="card-header bg">
<h1>File Upload in PHP and MYSQL</h1>
<p><?php echo $msg; ?></p>
</div>
<div class="card-body">
<form method="post" action="" enctype="multipart/form-data">
<input type="file" name="choosefile" class="form-control" value=""><br>
<button type="submit" name="uploadfile" class="btn btn-primary">Upload</button>
</form>
</div>
</div>
</div>
</div>
Line 37-52 – this is the scope of our front-end part that includes the form that will allow us to upload the selected file to the server.
Line 42 – this is the line that will give us the message if the file was uploaded successfully.
Line 45-48 – this is the form for uploading the files, The <input type=”file”> defines a file-select field and a “Browse” button for file uploads. The form also includes a submit button that will pass the values captured to the PHP script for processing.
- We will now create the script that will process the captured information in the form.
<?php
error_reporting(0);

$msg ="";

if(isset($_POST['uploadfile'])){
$filename = $_FILES["choosefile"]["name"];
$tempname = $_FILES["choosefile"]["tmp_name"];
$folder = "uplodedFile/".$filename;

$db = mysqli_connect("localhost","root","","file_upload");

$sql = "INSERT INTO file (filename) VALUES ('$filename')";
mysqli_query($db,$sql);

if(move_uploaded_file($tempname,$folder)){
$msg = "File Uploaded Successfully...";
}
else{
$msg = "Failed to Upload File...";
}
}
$result = mysqli_query($db,"SELECT * FROM image");
?>
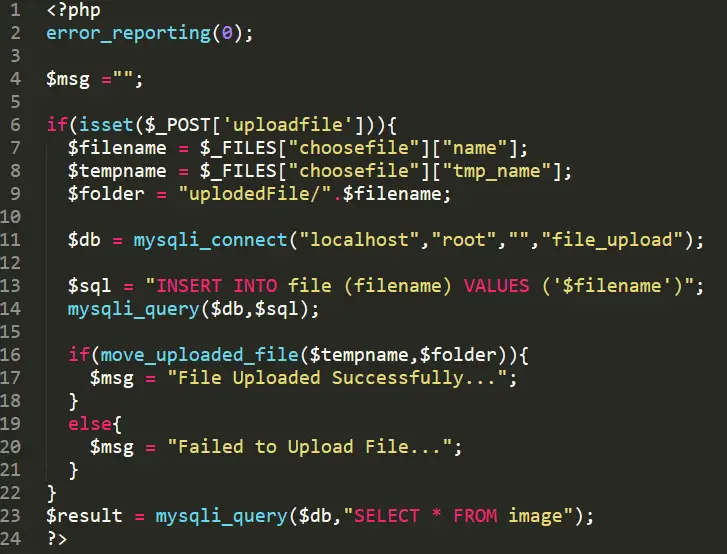
Line 1-24 – this is the scope of the PHP script that will connect to the database, process the uploading process and store the records on the database.
Line 7 – we have created a variable that will hold the filename of the selected file to be upload on the server.
Line 9 – we wil set the directory where the files will be uploaded.
Line 11 – this the connection string that allows PHP to connect to MySQL server. It is where we specify the database we want to connect. As mentioned, we will connect to the database we have created earlier and it is the file_upload database.
Line 13 – this is the INSERT INTO sql command. We wil store the filename of the uploaded file in the database table. The name of the database table is file and the column that will hold the filename of the file is filename.
Line 16 – we will now use the move_uploaded_file() function.
The move_uploaded_file(file, dest) function moves an uploaded file to a new destination.
The said function has two parameters:
- file – specifies the filename of the file uploaded.
- dest – the location where the file will be transferred.
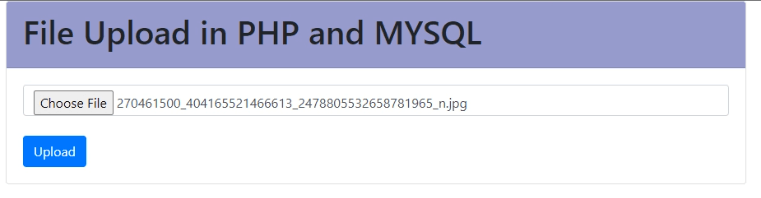
Output
Complete Source code
<?php
error_reporting(0);

$msg ="";

if(isset($_POST['uploadfile'])){
$filename = $_FILES["choosefile"]["name"];
$tempname = $_FILES["choosefile"]["tmp_name"];
$folder = "uplodedFile/".$filename;

$db = mysqli_connect("localhost","root","","file_upload");

$sql = "INSERT INTO file (filename) VALUES ('$filename')";
mysqli_query($db,$sql);

if(move_uploaded_file($tempname,$folder)){
$msg = "File Uploaded Successfully...";
}
else{
$msg = "Failed to Upload File...";
}
}
$result = mysqli_query($db,"SELECT * FROM image");
?>

<!DOCTYPE html>
<html>

<head>
<meta charset="utf-8">
<meta name="viewport" content="width=device-width, initial-scale=1.0, shrink-to-fit=no">
<title>File Upload in PHP and MYSQL</title>
<link rel="stylesheet" href="assets/bootstrap/css/bootstrap.min.css">
</head>

<body>
<div class="row">
<div class="col-md-8 offset-md-2">
<div class="card">
<div class="card-header bg">
<h1>File Upload in PHP and MYSQL</h1>
<p><?php echo $msg; ?></p>
</div>
<div class="card-body">
<form method="post" action="" enctype="multipart/form-data">
<input type="file" name="choosefile" class="form-control" value=""><br>
<button type="submit" name="uploadfile" class="btn btn-primary">Upload</button>
</form>
</div>
</div>
</div>
</div>
<script src="assets/js/jquery.min.js"></script>
<script src="assets/bootstrap/js/bootstrap.min.js"></script>
</body>
</html>
Summary
Users can upload files to a server using a technique known as a file upload system. Images, videos, documents, and other file kinds can all be stored via this method. The file upload mechanism can be utilized to store data for backup purposes or to exchange files with other users. People can exchange files online with other users using the file upload feature as well. Users can exchange files offline with other users using the file upload system. Users can exchange files with other users in a number of ways by using the file upload system.
In this tutorial, we have presented and explained the steps on how to create a simple file upload in PHP and MySQL. Relevant source code of the project was also discussed in detail. In addition, you can download the PDF tutorial and you can watch the video demo and presentation on our YouTube Channel
We hope you found this tutorial to be helpful! Wishing you the best of luck with your projects! Happy Coding!
You may visit our Facebook page for more information, inquiries, and comments. Please subscribe also to our YouTube Channel to receive free capstone projects resources and computer programming tutorials.
Hire our team to do the project.