Welcome to our next tutorial in Visual Basic 6, this time we’re going to learn how to populate Listview control from our database.
Let us first define what a ListView control in Visual Basic 6 is.
A ListView control in Visual Basic 6 allows you to add rows of data from a database table or you can set it manually by coding. We can organize our data in four different ways: Icon, SmallIcon, List, Report. The further explanation of ListView control will be discussed on a different article.
Let us proceed to our lesson proper.
After we have learned how to connect visual basic to ms access, insert a new record, update the record and delete a record from database, it is time for us to get the records from database and display it in our Visual Basic program, specifically display the records in the Listview control of Visual Basic 6.
This is actually the Part 5 of our tutorial, for you to follow the step by step procedure kindly download the previous file (Delete a record from database).
The tutorial starts from here:
1. After you have downloaded the file kindly extract it and open Project1.vbp.
The visual basic project is composed of two Forms and one Module. The Module (DBConnect) contains the code to connect to our MS Access database. SplashFrm Form contains an introductory message of the project and has nothing to do with the functionality of the project. InsertRecordFrm Form is where you can insert, update and delete record from database.
2. Add a new form in our project, to do that go to Project in the menu bar and click Add Form then select Form and click Open.
3. Rename the form into ListviewFrm.
4. Before we can use the Listview control of Visual Basic 6 we must add it first in our Components. In the menu bar, click Project and click Components.
5. Dialog box will appear. In the lists of components kindly check the Microsoft Windows Common Controls 6.0 (SP6) and click OK. The image below shows the controls added to our project.

The highlighted one is the ListView control.
6. Drag the Listview control in our newly added form (ListviewFrm). You can set your preferred size of the listview control.
7. By default there are no columns available in the listview, so what we are going to do is to add a columns that corresponds to the columns or fields in our database table (tblStudent). Right click the listview and click Properties.
8. A dialog box will appear, and then in the Column Headers tab, click Insert Column.
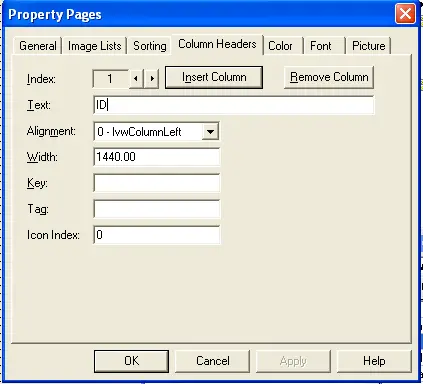
Note: the Text field will be the header name of that column; you can also insert multiple columns as you want.
9. The listview should have 5 columns because the tblStudent has also 5 fields.
10. After you have inserted the 5 columns kindly add the code below to our form (ListviewFrm). To paste the code just right click the ListviewFrm and click View Code and paste the code.
Public Sub DisplayStudents()
Dim lstItem As ListItem
If rs.State = adStateOpen Then rs.Close

sql = " SELECT tblStudent.ID, tblStudent.studentName, tblStudent.studentAge, tblStudent.studentContact, tblStudent.studentAddress" & _
" From tblStudent" & _
" GROUP BY tblStudent.ID, tblStudent.studentName, tblStudent.studentAge, tblStudent.studentContact, tblStudent.studentAddress" & _
" ORDER BY tblStudent.ID;"

  rs.Open sql, conn
  ListView1.ListItems.Clear
  Do While Not rs.EOF

        Set lstItem = ListView1.ListItems.Add(, , rs(0).Value)
            lstItem.SubItems(1) = rs(1).Value
            lstItem.SubItems(2) = rs(2).Value
            lstItem.SubItems(3) = rs(3).Value
            lstItem.SubItems(4) = rs(4).Value
            rs.MoveNext
            Loop
End Sub
11. We’re going to call the function in order for it to execute its code. Call the function every time the form loads. The code will look like:
Private Sub Form_Load()
DisplayStudents
End Sub
12. Let’s open the InsertRecordFrm form and add a command button, label it as View List and name that button into cmdList, after that the code (ListviewFrm.Show) to the buttons click event. The code will look like:
Private Sub cmdList_Click()
ListviewFrm.Show
End Sub
We can now open our ListviewFrm form.
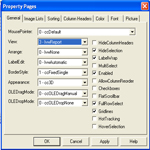
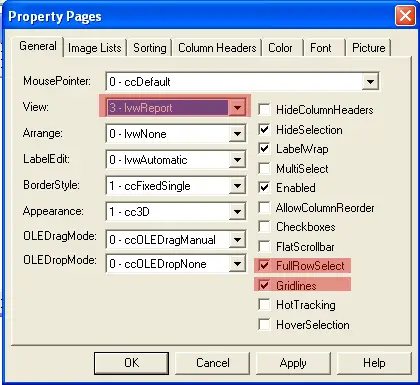
13. Before we test the project kindly set the general properties of our listview. Set the View into lvwReport, check the FullRowSelect and Gridlines.
14. Kindly test the project by pressing F5.
Source code is also available for download. Thank you so much for visiting the site.
In case you have encountered some errors, you can email us or comment your queries below.
The part 6 is on searching a record from database using visual basic 6.