If you are wondering on how to upload a picture in a database using the file path or the path where the picture resides, then this tutorial is just for you.
Here are the steps on how to upload a picture or image in MS Access through Visual Basic:
Creating the Database and Table
1. Create MS Access database and name it as Data.mdb (In this tutorial we need ms access database (2000-2003 format) (.mdb))
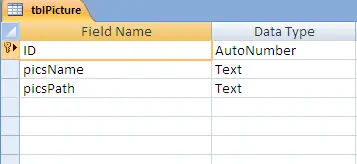
2. Create a new table and name it as tblPicture.
3. Save the table and insert the following fields:
Field name – Data Type
ID – Autonumber
picsName – Text
picsPath – Text
The table should look like the image below:
After we have created our database, let us proceed in our visual basic program.
We will skip the procedures on how to connect visual basic 6 to ms access, but if you forgot that, kindly visit the tutorial on how to connect vb6 to ms access.
In Visual Basic Program
1. Open your visual basic 6 program and create a new project, select Standard EXE.
2. Let’s add a form to our project and name it as UploadPicsFrm.
3. We need to add the component Microsoft Common Dialog Control 6.0 (SP6). On the Project menu click Components; look for Microsoft Common Dialog Control 6.0 (SP6) and check the component to add it on our project and click OK.

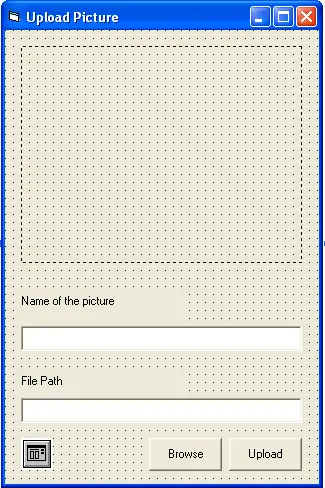
4. Open the form (UploadPicsFrm) then drag the common dialog object in the form.![]()
5. Add an image object on the form.![]()
6. We need also two Textbox and two command button. Name the first textbox as txtpicsname and the other as txtpicspath, name the first command button as cmdUpload with the caption Upload, the second command button as cmdBrowse with the caption Browse.
Note: set the Stretch property of the image control or object into true so that the image control will not automatically resize or expand.
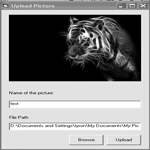
The form should look like the image below:
7. Add the following code in the click event of the cmdBrowse button.
The code will look like this:
Private Sub cmdBrowse_Click()
Dim extractedpath, thepic As String
Dim lentxt As Integer
Dim imge(1) As IPictureDisp

With CommonDialog1
    .DialogTitle = "Browse Pictures"
    .Filter = "JPEG Files(*.jpg)|*.jpg|BMP Files(*.bmp)|*.bmp"
    .ShowOpen
    Set imge(1) = LoadPicture(CommonDialog1.FileName)
    Image1.Picture = imge(1)

    txtpicspath.Text = (CommonDialog1.FileName)
    thepic = (CommonDialog1.FileName)

    Image1.Picture = LoadPicture(thepic)

End With
End Sub
The code above will open a dialog box that will allow you to select JPEG files. After you have selected an image that image will be displayed in the image control and the path of the file will display in the txtpicspath.
8. Next step is to create a function that will store the name and the file path of the image in our database.
Here’s the code:
Sub UploadPicture()
If rs.State = adStateOpen Then rs.Close
    sql = "Select * from tblpicture Where picsName='" & txtpicsname.Text & "'"
    rs.Open sql, conn
        If rs.RecordCount >= 1 Then
        MsgBox "Duplicate Picture name Found.Please enter another name", vbInformation, ""
        Exit Sub
        End If
            With rs
                .AddNew
                !picsname = txtpicsname.Text
                !picsPath = txtpicspath.Text
                .Update
            End With
    MsgBox "New Record Successfully added", vbInformation, ""
    Unload Me
    UploadPicsFrm.Show
End Sub
9. The function will not execute if we will not call it and this is how to do it.
Private Sub cmdUpload_Click()
UploadPicture
End Sub
The function will execute if the user clicks the Upload button.
10. Press F5 to test the project.
Note 1: your vb project (.vbp), the executable file (.exe), the form , the module (DBConnect) and the ms access database (Data.mdb) should be on the same directory or folder.
The source code of this tutorial is available for download.
Hope you enjoyed and learned something from this tutorial.
Video tutorial will soon to follow.
[wpdm_package id=’1601′]
thanks for the post. am also trying to figure out how to upload and will try this